Last Updated on June 28, 2022 by WP Knowledge Hub
WP Bakery Page Builder is a front-end and back-end page builder that lets you build a responsive website and manage your content easily and intuitively. It let’s users creates stunning and beautiful pages with its award-winning drag and drop builder, that replace WordPress’ default block editor.
What Is WPBakery Page Builder (Formerly Visual Composer)?
WPBakery Page Builder, formerly known as Visual Composer, is one of the oldest WordPress page builders. Even before Guttenberg, Visual Composer had hundreds of thousands of downloads and very high user reviews and ratings, and now that it’s re-branded to WPBakery, it continues to be one of the most used page builders with premium themes on themeforest.net.
Is WPBakery a Good Page Builder?
If you want to create more complex page layouts than what’s possible with WordPress’s default block editor, than by comparison, yes, WPBakery is a much better block builder.
Some people would disagree and say that DIVI, or Elementor are better page builders, but WPBakery is one of WordPress’ most popular plugins for a reason.
WPBakery will allow you to:
- Easily create rows and columns
- Easily animate any element with CSS
- Create complex, full-page layouts quickly without knowing code
If you want to build responsive and complex layouts in WordPress, this is the page builder for you. WPBakery Page Builder is a drag-and-drop page building tool that allows you to create fully responsive, complex pages in a very short amount of time.
How To Use WPBakery Page Builder
First, it’s important to know that WPBakery is not part of the WordPress free plugins library, and that it’s a premium pro plugin that need to be purchased. Once you’ve bought it, upload it, install it and activate it. When you create a new page from the WordPress dashboard, you should be greeted with the “Backend Editor”.
Backend Editor
Dy default, you setup should look like the image below. If it doesn’t, click on the blue button that says “Backend Editor“. Once you do, it will turn into a button that says “Classic Mode”, and you can revert back to WordPress’ default block editor anytime.

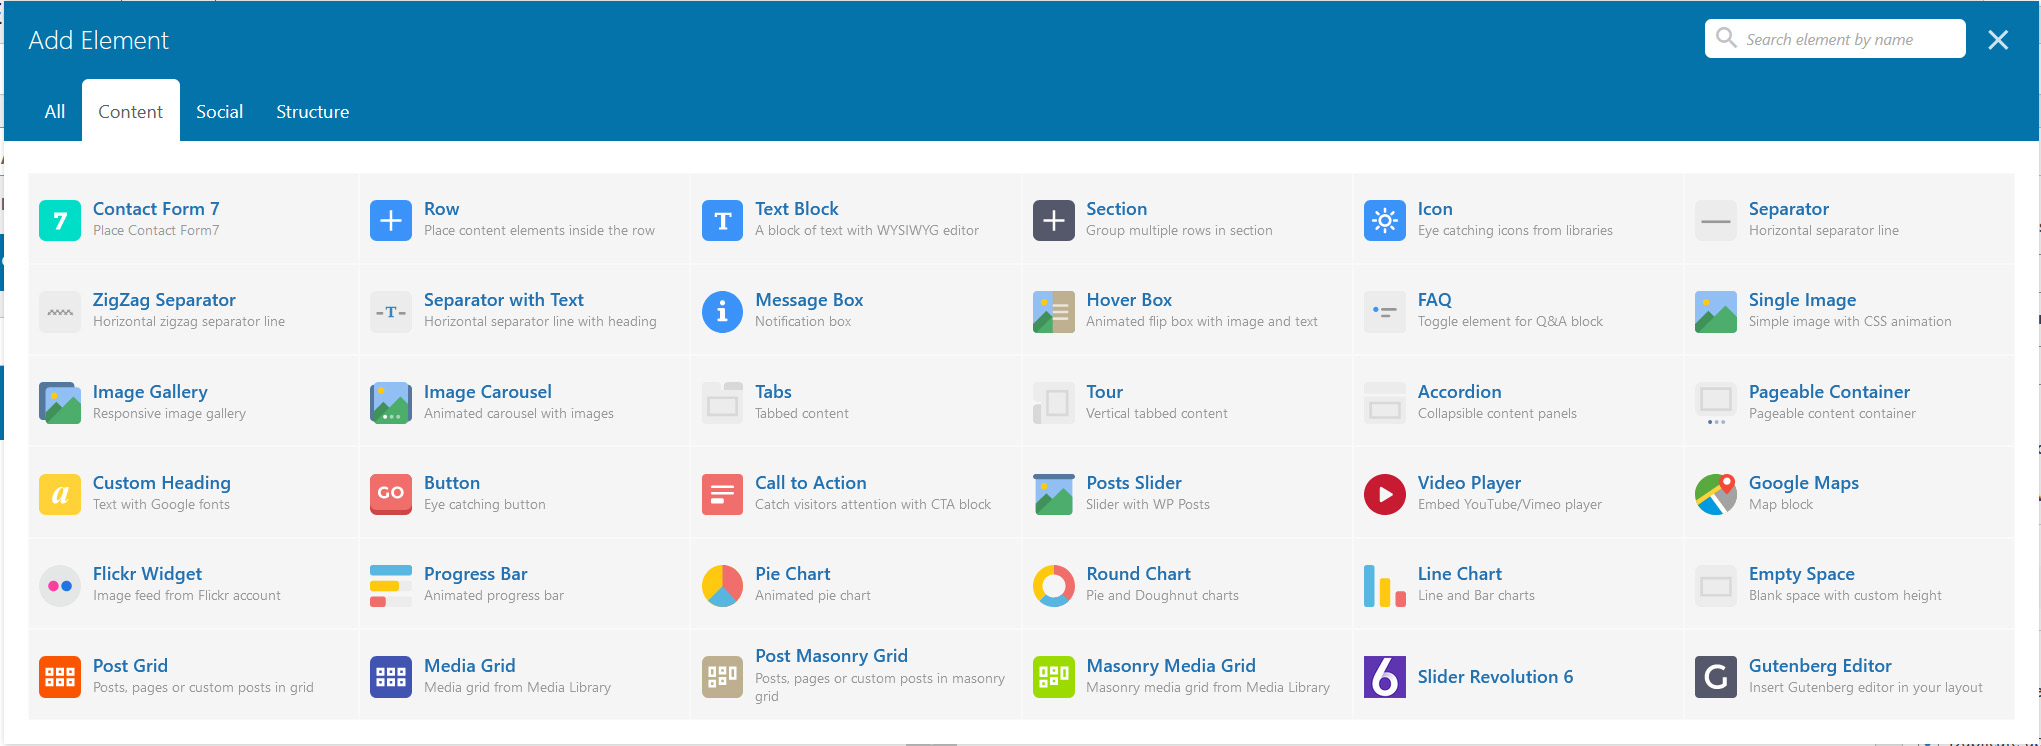
Start by clicking Add Element to create your first Row:

If you want to create complex layouts, you’ll need to understand that modern web design is basically a system of Rows and Columns. Each section you see on a modern web page is composed of a Row with Columns.
There are full-width Rows with background images or colors that take up the entire screen space, and there are boxed Rows which help center the content in the middle of the screen.
Regardless of which you choose, each Row will always have at least 1 Column. A Row can have multiple Columns, but it needs at least 1.
When you create a new Row, you’ll see that a new box appear in the editor where you’ll notice (among other things):
- Options in the top-left corner of the new box that allow you to change the number of columns inside the row. Keep it as one, or break it into as many as 12 little columns inside your row.
- A little pencil in the top-middle of the row – this is the Edit button for the Column Settings. We’ll explain more about settings later.
- A little pencil in the top-right corner of the row – this is the Row Settings. We’ll check in on those a little later as well.

This is the basis for your new layout. Inside this Row and Columns, we will place content and start creating our masterpiece.
I’m sure by now you’ve also notice the little + icons inside and below our new Row, right? The + inside the row or column is where we add our content to each respective area, and the + icon below the Row is inviting us to create a second row, or additional content BELOW the Row, not inside.
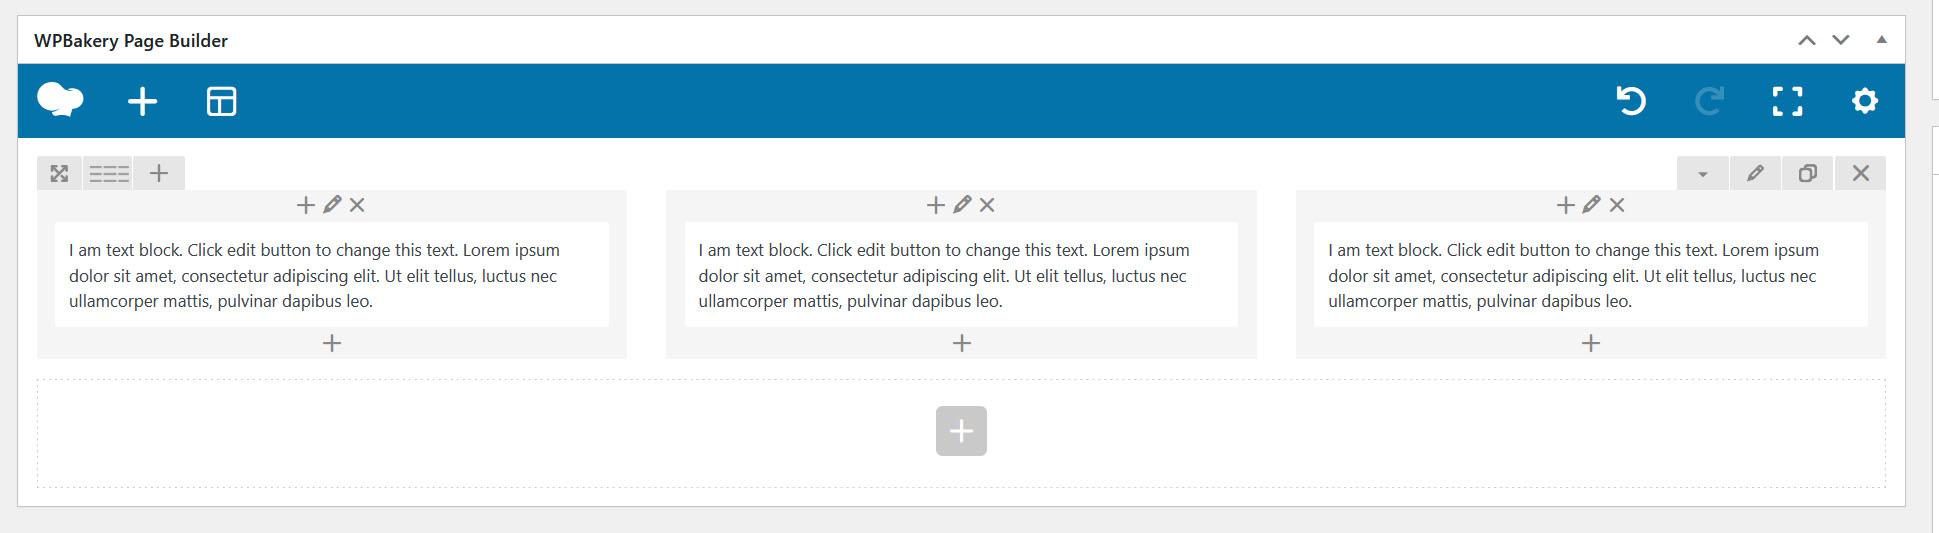
Let’s try a little demo. Start with our first and only row, and hover over the 3 lines in the top-left corner of the Row that let you change the number of columns. Break this Row into 3 Columns by selecting the icon with 3 Columns.
Once you’ve done that, your Row should have changed its appearance and reflect your 3 Columns in the editor, where you can now click on the little + icon in the first Column and add a Text Block:

Selecting to add a Text Block to a Column automatically brings up your Text Block Settings. Here you can edit your text with a WYSIWYG editor, much like you would a Word Document. You can even add images directly to your Text Block by clicking the Add Media button at the top of the Text Block Settings.
After adding elements make sure to save them. They won’t be live on your page until you actually publish this page, but it’s important to save as you go.
Repeat that step for each Column and you should have something like this:
Now that we’ve create our first 3 Column layout, it’s time to make it a bit more interesting.
Next, we’ll play with the Row and Column Settings to pretty up our content a little bit. Inside these Settings we can:
- Turn a boxed Row into a full-width Row
- Add a background-image to our Row
- Add a background-color to our Row
- Add a Parallax effect to our Row
- Change the Row padding and Margin
- Change the Column padding and Margin
- Add a CSS class or ID to a Row or Column
- Animate the blocks
- And more!
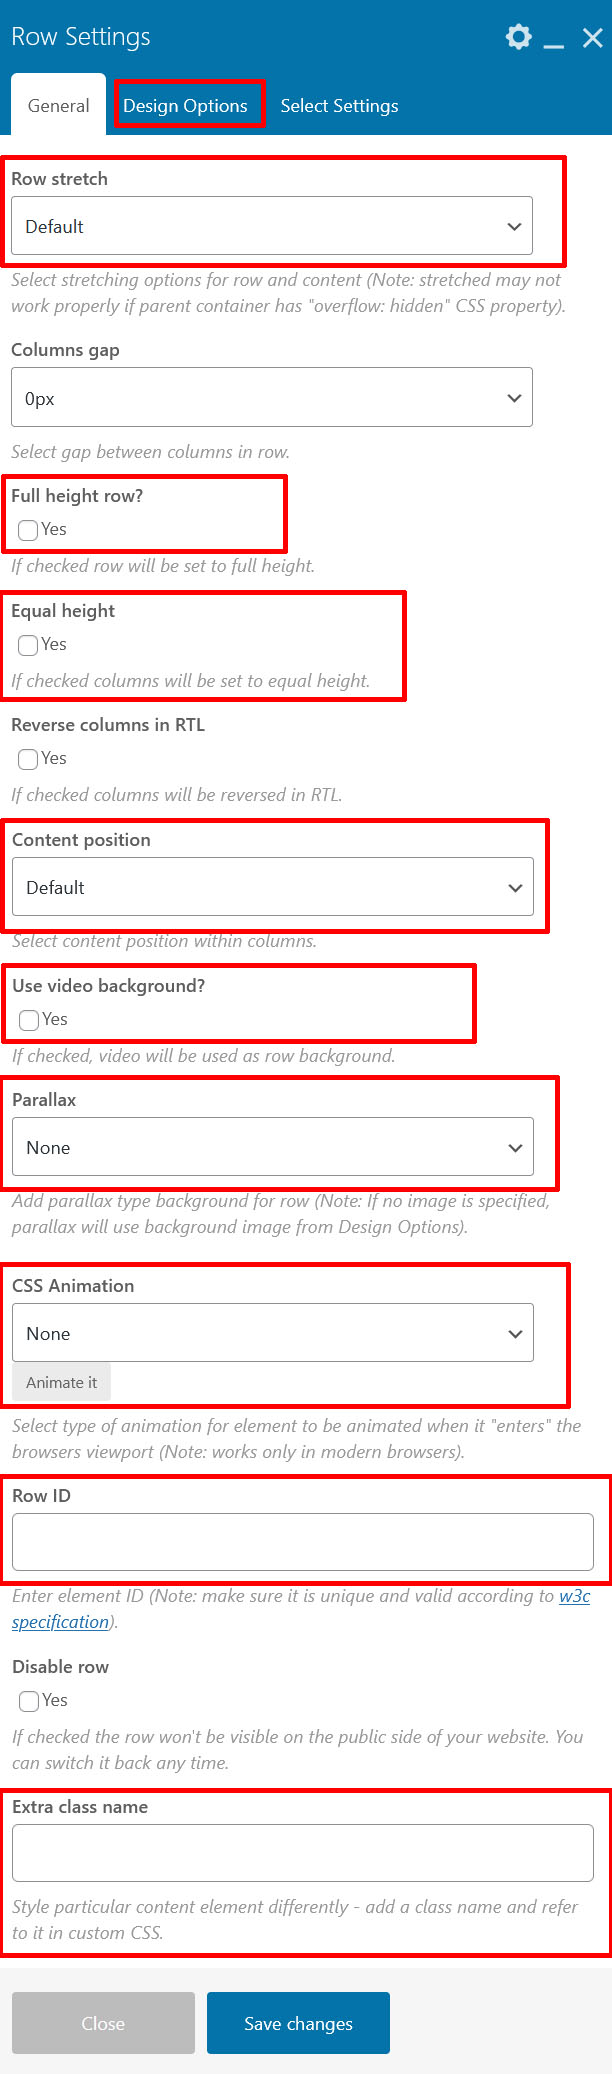
WPBakery Row Settings
There are some very important settings inside the Row Settings that help define your design or layout. To access the Row Settings, you must first click the little pencil in the top-right of the respective Row. Doing so opens a box that contains these important settings (among others):
General Settings
- Row Stretch – allows you to set your boxed, centered Row as a full-width Row that takes up the entire width of your screen.
- Full height row – sets the Row as full-height, taking up the entire height of the screen (for Hero images, etc.)
- Equal height – sets the columns inside the Row to be matching heights at all times
- Content Position – vertically-align the content inside the row to the top, bottom, or middle of the Column
- Use video background – use a video BG instead of an image (image backgrounds are on the next tab, under Design Options)
- Parallax – this is a sort of 3d depth effect where the background scrolls slower than the rest of the content, making it seem far away. To use it you must set None to one of the available options, and choose a background image that is large enough to fit the entire screen
- CSS Animation – this allows you to use a library of pre-made animations to animate your content in, and out of the screen (Fade, Bounce, Slide In or Out, etc.)
- Row ID – helpful input box to add IDs to your Row
- Extra class name – helpful input box to add custom classes to your Row
- Design Options – the next tab in the top blue bar is where you’ll set your padding, margin and background image.
Design Options
- CSS Box – lets you adjust your padding and margin
- Border Settings – let you set borders around this block and change the style
- Background – set the background color or image and background size.
Note: a lot of these same settings appear in almost every WPBakery Block. In this case, we’re using the Row Settings to show you, but you’ll find almost the exact same options in the Column Settings
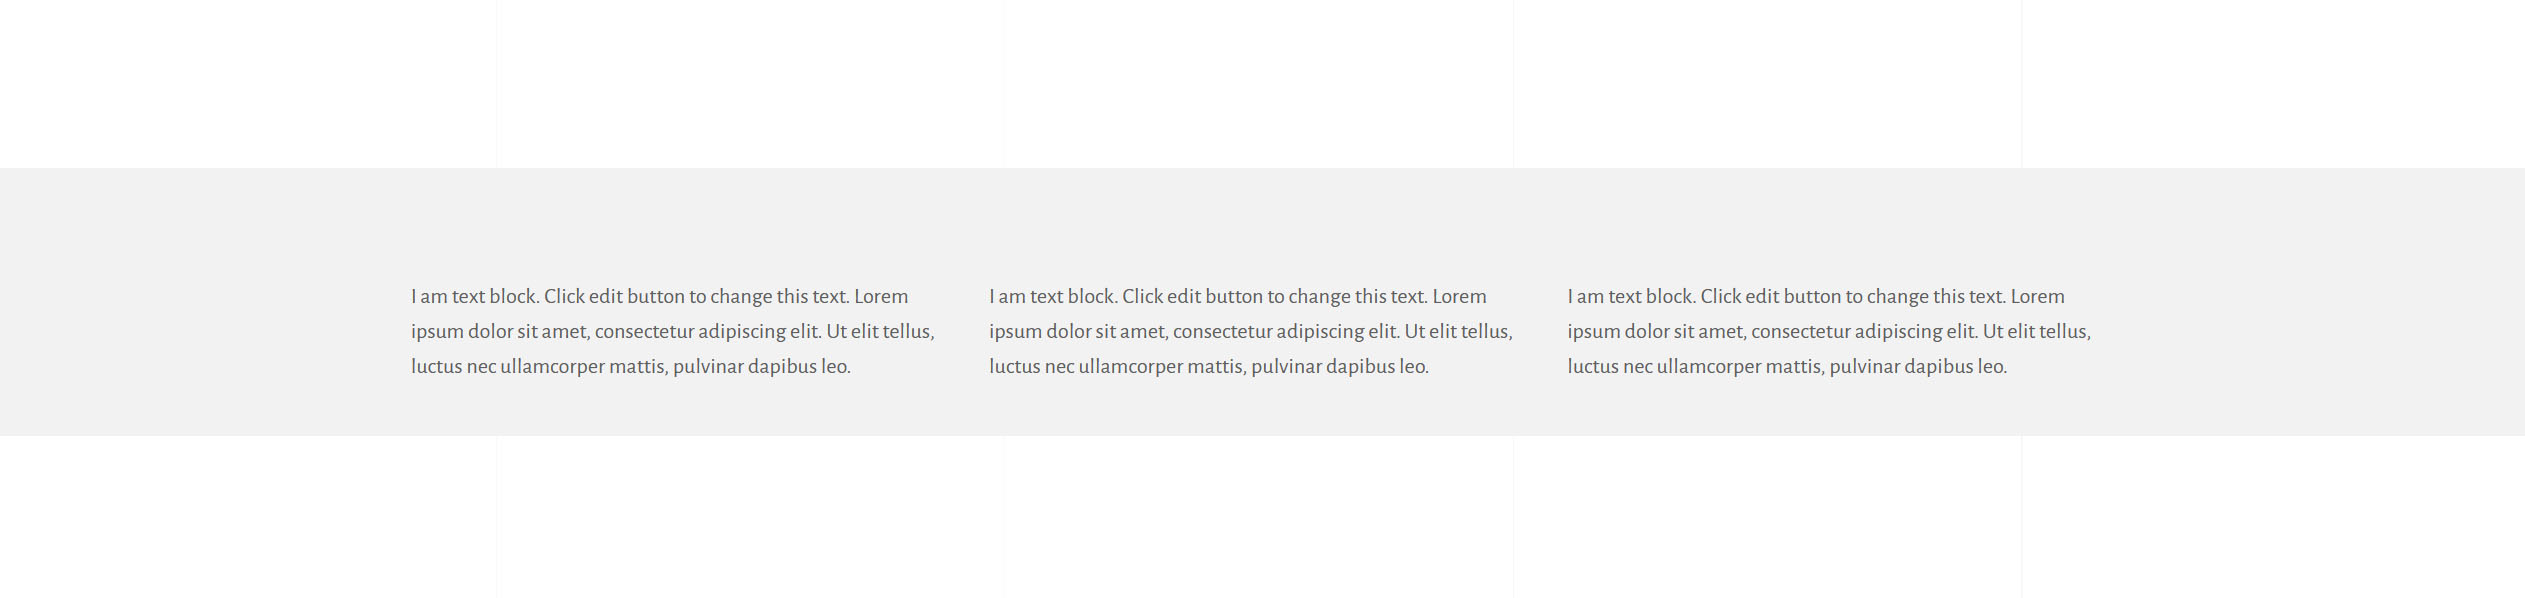
Now that you know what the Row Settings are and what they do, let’s add a background color, some padding, and make it full-width.
To do that, open the Row Settings on our 3 column Row by clicking the little pencil in the top right corner of this Row, and first, change Row Stretch to Stretch Row.
Next, open the Design Options tab, and in the CSS Box, add 40px of white-space above and below the row by adding the number ’40’ in the top and bottom spaces in the “Padding” box, the darkest grey one.
Finally, open up the Select Color box from the Background section, and choose a light grey color using the Color Picker.
Now that you’ve created a clear seperation from the rest of your content using your awesome design skills, your new 3 Column Row will look like this:
Here’s some important WPBakery blocks you can use to create awesome layouts and content:
WPBakery Responsive Layouts
By default, the layouts that you create with WPBakery will be naturally responsive, but in many cases, you’ll need to make small adjustments to individual elements to make everything fit together perfectly.
This is why each element’s settings has a Custom CSS Class option where you can add a custom class and write CSS for it in your Customizer.
You can also hide or show certain Columns in the Column Settings!
WPBakery Column Settings
In order to access the Column Settings, you’ll need to hit the little pencil again, but not the little pencil in the top right of the Row. Instead, hit the little pencil on top of the individual Column to edit that particular Column.
This will open up the Column Settings, where you’ll see many of the same exact options as the Row Settings. What’s new here is the little “Responsive Options” tab at the top:
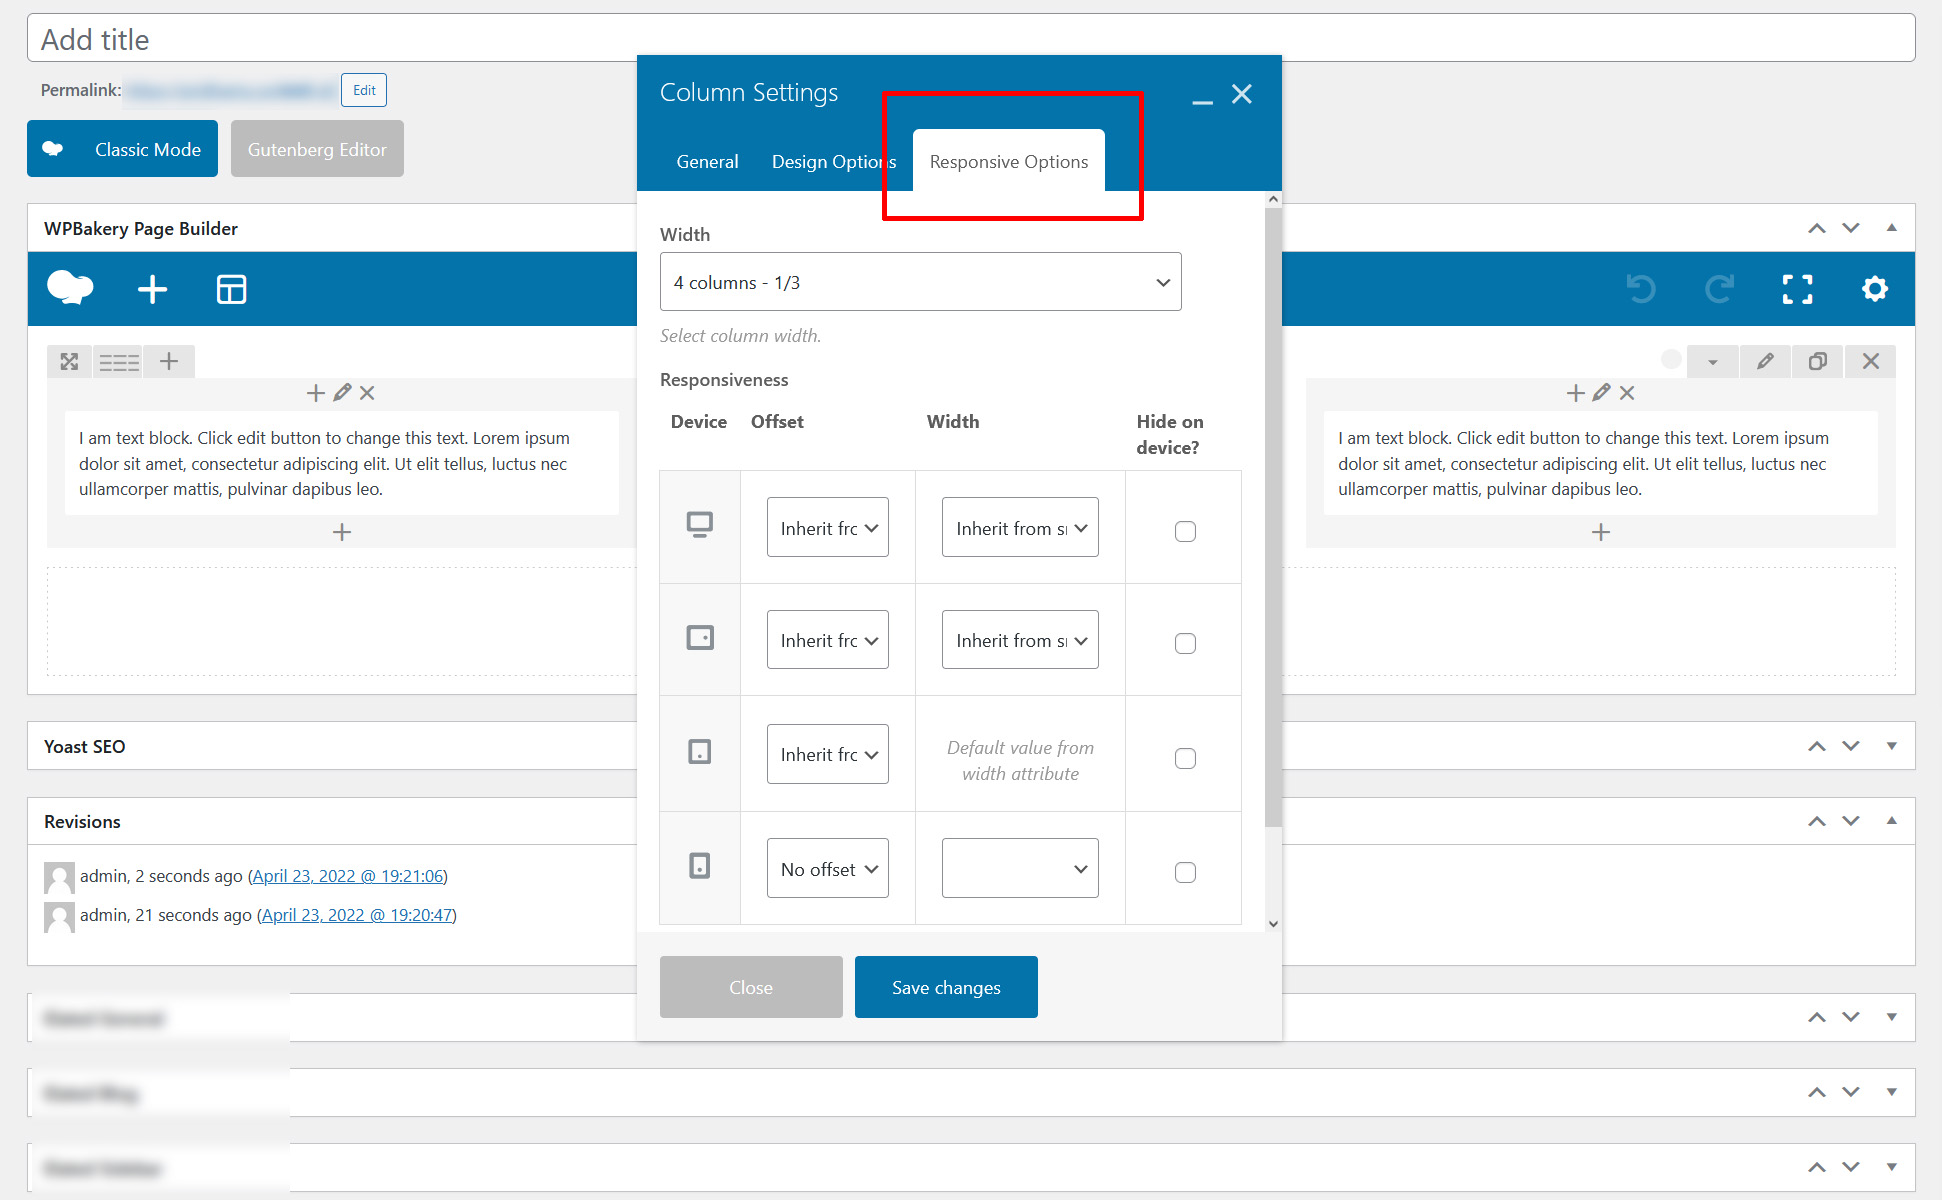
Here, you can pick and choose which column shows up on which device!
Frontend Editor
The front-end editor works exactly as the back-end editor, but it let’s you edit the page in real-time directly from the front-end itself, instead of editing the page through the WordPress editor. Each user has their personal preference, but in the end, editing the page or post with WPBakery Page Builder is the same either way.
The front-end Page Builder includes all of the same options, but the only difference is that you can see the actual page elements as you build: