Last Updated on April 21, 2022 by WP Knowledge Hub
There are many good reasons to migrate your WordPress website over to a new hosting provider. Maybe your old host is too slow, or maybe you want to work with a more modern one that offers better options. Alternatively, maybe your staging website was built on a temporary domain name and now you need to move it to a new one.
Fortunately, migrating your website is not as hard as you think. Doing it manually can be quite daunting and time-consuming, but most big hosts provide automated services now, and if they don’t, there are many plugin options that make it easy to transition!
Migrating WordPress Websites
Should I migrate Manually or Automatically?
Migrating a WordPress website can be quite difficult if you do it manually (not with a plugin), unless you are a pro with FTP clients, like FileZilla, and know how to navigate a database with phpMyAdmin.
Luckily, there are a lot of automated options, which we will cover later on. If you want to do it (or have to do it) manually, read this following part. If you prefer a plugin or a hosting-managed solution, skip to the next part.
How to Migrate Your WordPress Website Manually
Step 1) Choose a New Hosting Provider and Setup a Clean WordPress Installation
All modern hosting providers will offer a range of servers, from shared to Managed accounts, and it’s up to you to decide which is best for your business. In order to do that, you need to understand what they are:
- Shared Server: a shared server account is one that usually costs a few dollars a month. This is the standard Linux/Apache account that comes with a hosting panel like cPanel or Plesk, that let’s you manage your own settings, but won’t give you too much power or freedom. They’re meant for regular websites that get small to medium amount of traffic, and don’t tons of features like an infinite number of email addresses or databases.
- Virtual Private Server (VPS): a VPS is like a shared server, but your share of it has more dedicated resources available to it. This is great for people who are more tech-savy and know the basics of system administration.
- Dedicated: a dedicated server is the most powerful account you can typically get (unless you have a custom one as part of a special plan), where you get an actual whole server that supports only your website. These accounts are for large corporations and enterprise businesses that require lots of bells and whistles.
- Managed: a very popular type of hosting service for WordPress websites, managed accounts take away your access to a technical hosting panel, but automate a lot of the processes so the user can only do what is absolutely necessary from a front-end interface. This is for any kind of business that doesn’t have an IT team or technical professional with whom they work. It can be very practical and offer lots of cool features like one-click staging websites, but it takes away the ability to customize the server, would you want to.
In order to choose the best option for your business, you’ll need to assess what your goals and main priorities are.
Once you do, you’ll need to install a fresh version of WordPress, which should be done via Installatron or Softaculous, or however the hosting provider offers the WordPress setup process. Most hosts have a one-click install option. If they don’t you might want to reconsider your hosting decision once again.
Step 2) Back Up Your WordPress Website
Back Up the Files
The first step is to download your website files. For this, you’ll need one of two things. You can use either your hosting panel’s File Manager or an FTP client like FileZilla. You should be able to find your FTP credentials within your hosting account details, and use them to connect to the server.
After you connect to your website’s server, you’ll need to go to your WordPress root folder, which contains all the files on your site.This is typically called either public_html or www, or something obvious that you should recognize.
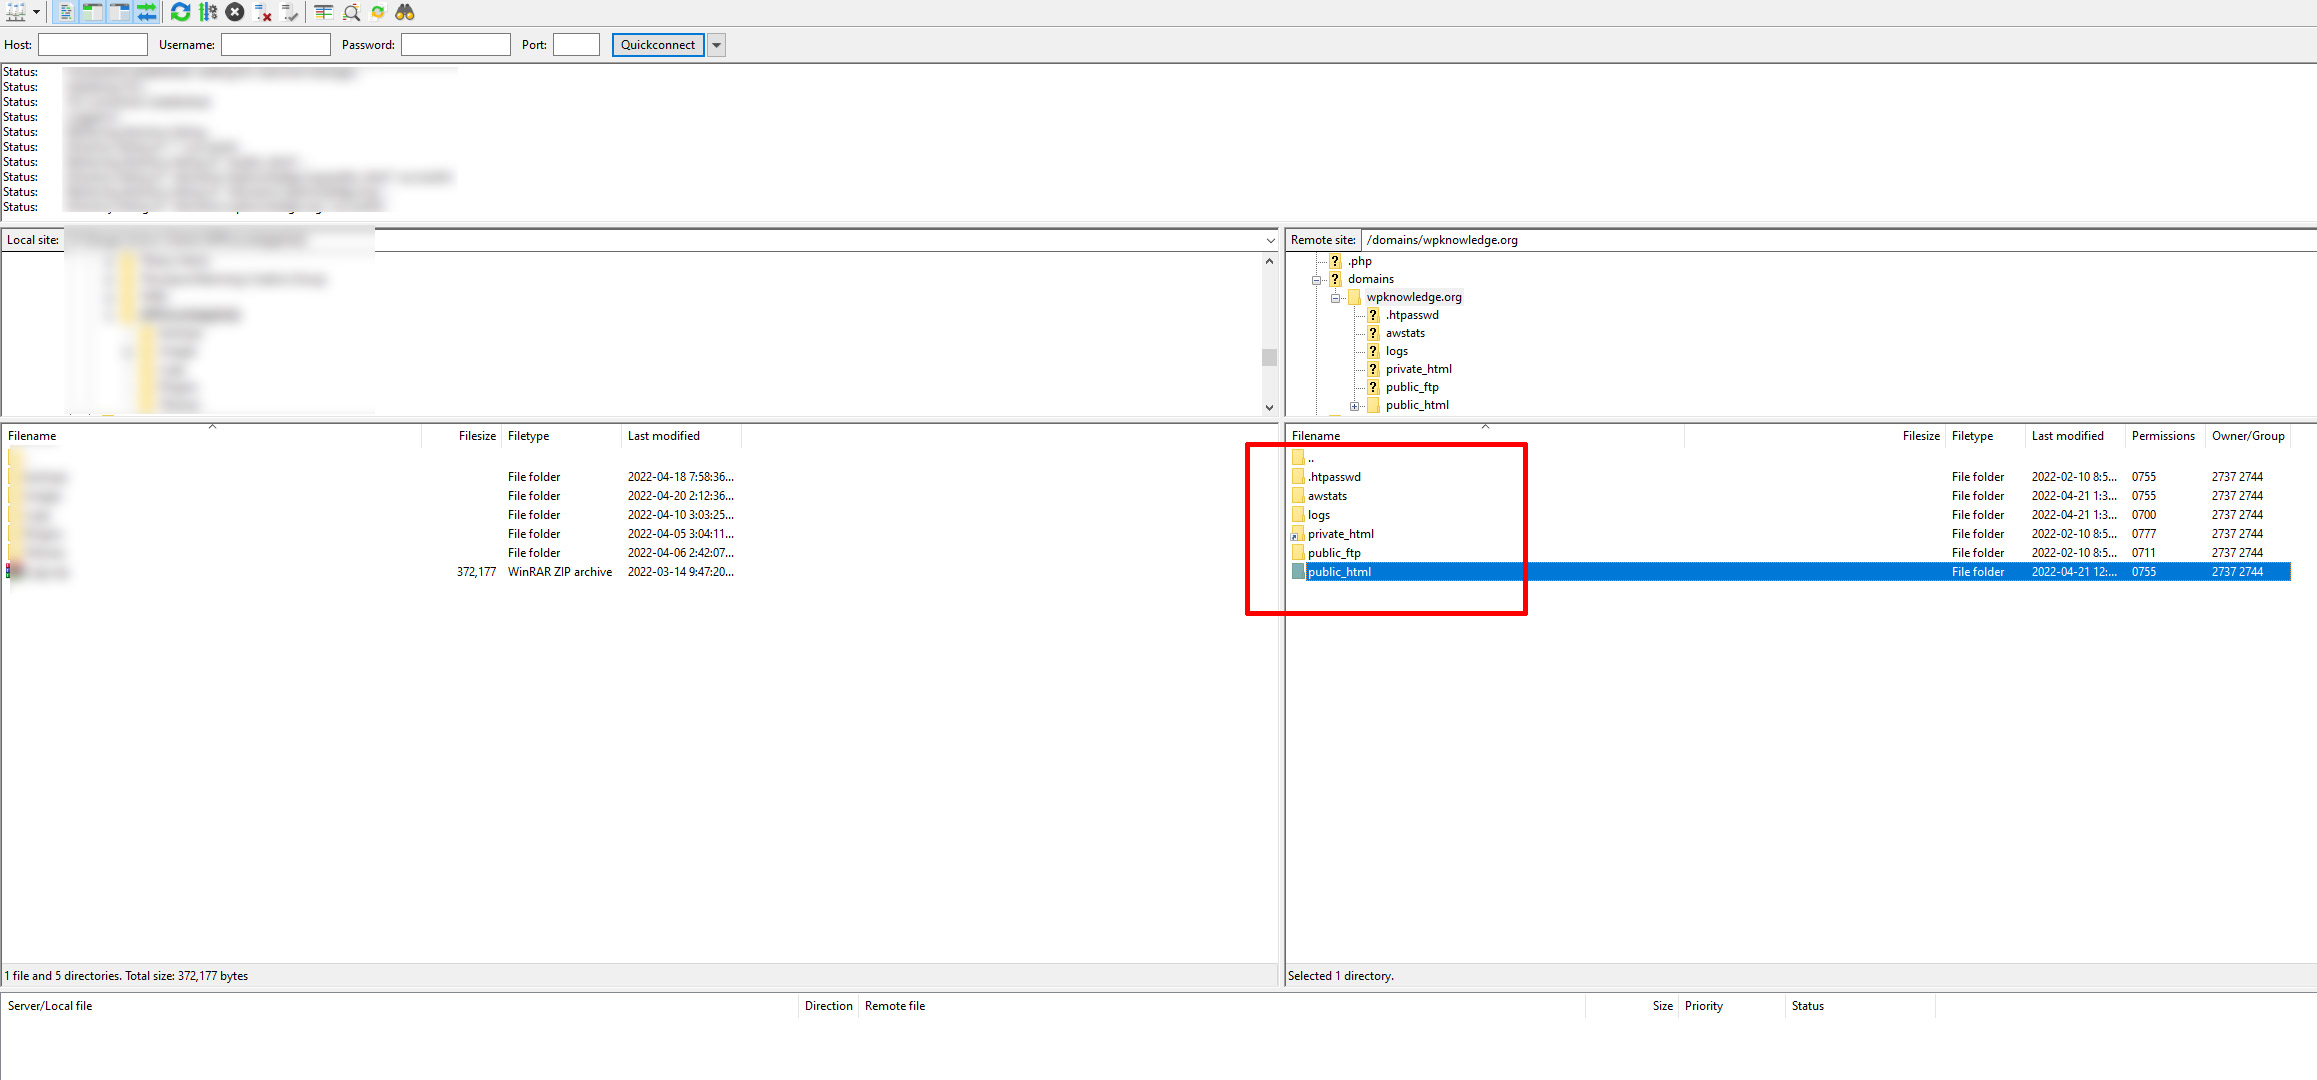
Right-click on that folder and choose the Download option, or simply drag it into the left box to your local machine.
This will download a copy of your entire root directory to your computer. The process can take a while if it’s done on FTP (depending on the size of the website it could take anywhere from 30 seconds to an hour +), but if you use your hosting panel’s File Manager “Compress” and “Download” options, it will only take a few seconds.
Back Up the Database
Now you need to back up your WP database. This is where all the information about your content, post, pages, settings, users, and more is stored.
To do this, you’ll need to access your hosting panel once again, and look for either a “Database”, “MySQL”, or “phpMyAdmin” option. The Database option should show you a list of your databases (it would be helpful if you know which one your website is using if you have many – if you don’t you can see the name of your database in the wp-config.php file, which is located in the root as well), which would end up taking you to the phpMyAdmin screen either way.
Once inside the phpMyAdmin panel, click on your website’s database from the list on the left, then click on the Export tab in the main menu. Select the Quick option under Export Method, and hit Go:
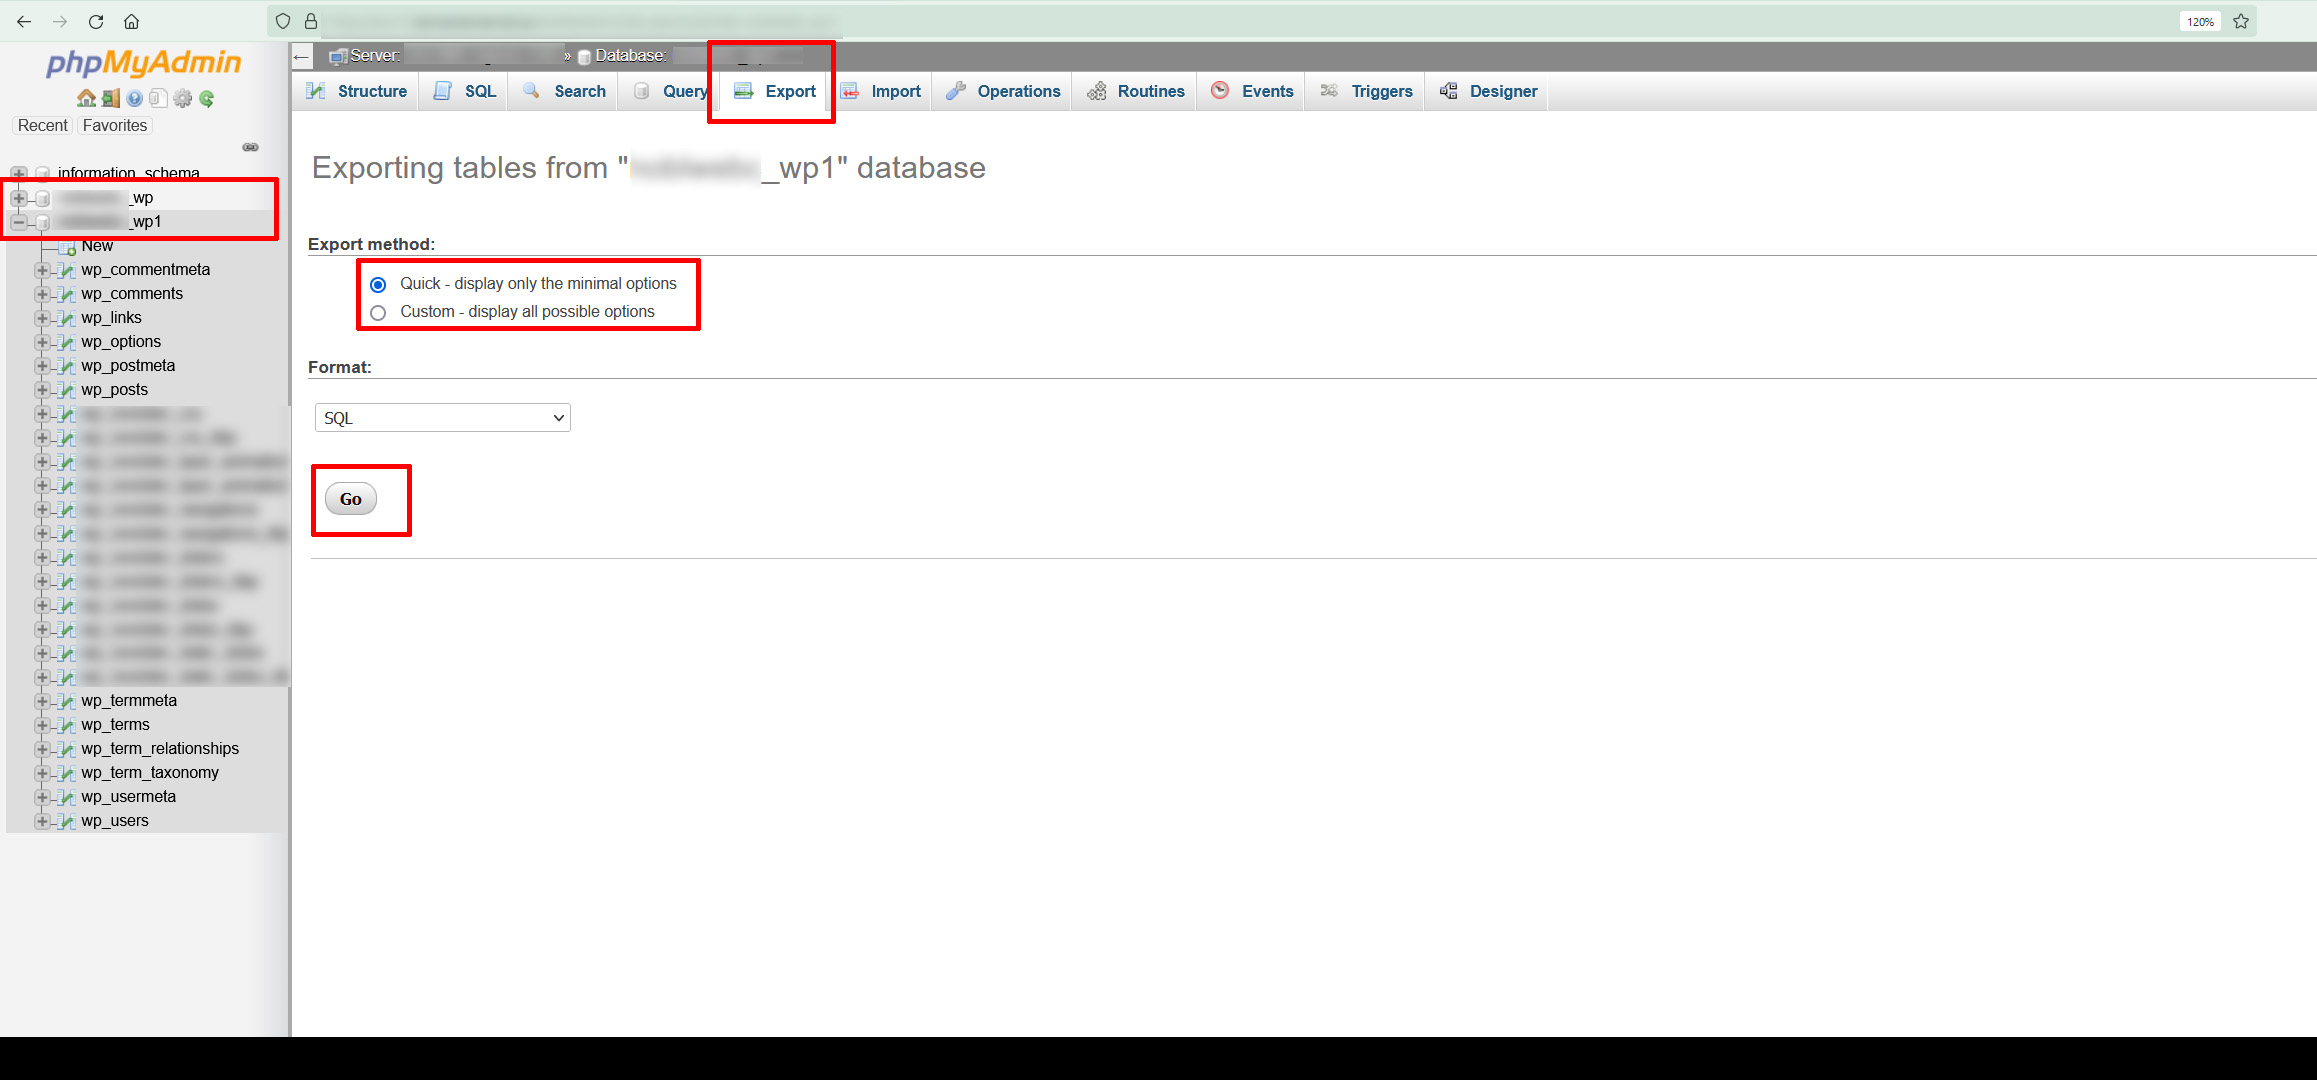
Your WordPress website’s database will be downloaded in the .sql format, and you can save that to your computer (preferably in the same folder as where you saved your files to eliminate confusion).
Step 3) Upload Your Files and Database to the New Web Host
In this step, you will have to overwrite the files and the database we created in the first step. When we install a new WordPress installation, it automatically creates the files and the database for you. Now, you simply need to log into your hosting panel and upload your files, plus import your database to replace the existing one on your new host.
In the following example, we’ll be using cPanel. Here’s what you have to do to replace the database:
Import Your Database
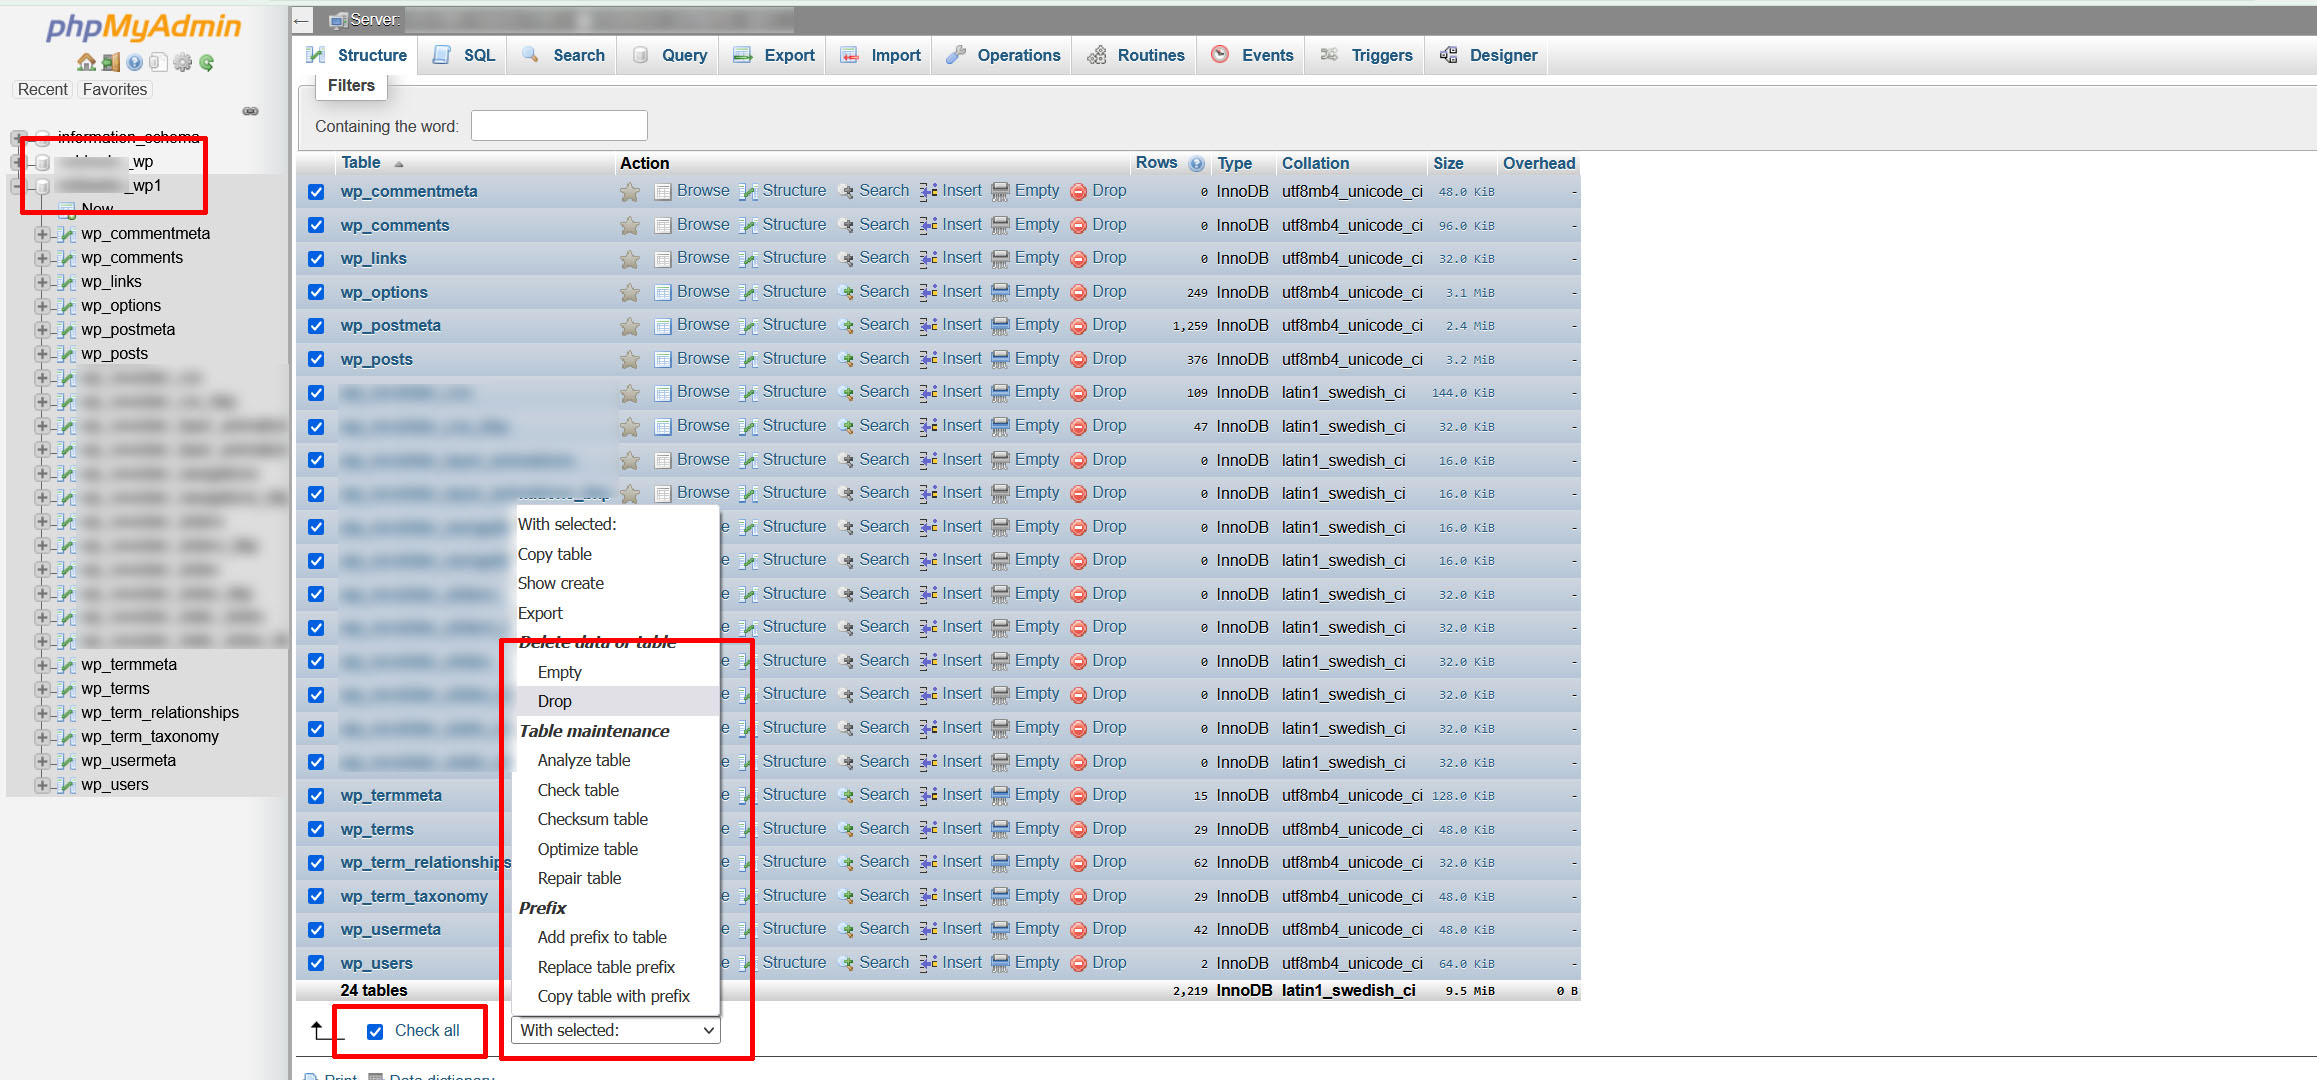
- Find the Databases section in cPanel, and choose phpMyAdmin.
- Click on your database, then click on Check All at the bottom, and open up the With Selected: drop down, then DROP all tables from your new host’s WordPress database installation we did in the first step.
That’s it! Note that if your domain name has changed, there is an additional step you must take to change all references of your old domain to the new one in the SQL tab in the top navigation.
How To Replace Your Old Domain Name with the New Domain Name (OPTIONAL – ONLY IF YOUR DOMAIN NAME HAS CHANGED!)
In order to remove all references of your old domain name from your new website, you will need to click on the SQL tab in the top navigation of the phpMyAdmin, and enter this code:
UPDATE wp_posts SET guid = replace(guid, 'http://olddomain.com','http://newdomain.com');
UPDATE wp_posts SET post_content = replace(post_content, 'http://olddomain.com', 'http://newdomain.com');
UPDATE wp_links SET link_url = replace(link_url, 'http://olddomain.com', 'http://newdomain.com');
UPDATE wp_links SET link_image = replace(link_image, 'http://olddomain.com', 'http://newdomain.com');
UPDATE wp_postmeta SET meta_value = replace(meta_value, 'http://olddomain.com', 'http://newdomain.com');
UPDATE wp_usermeta SET meta_value = replace(meta_value, 'http://olddomain.com', 'http://newdomain.com');

/*UPDATE wp_options SET option_value = replace(option_value, 'http://olddomain.com', 'http://newdomain.com') WHERE option_name = 'home' OR option_name = 'siteurl' OR option_name = 'widget_text' OR option_name = 'dashboard_widget_options';*/
UPDATE wp_options SET option_value = replace(option_value, 'http://olddomain.com', 'http://newdomain.com');
In the code above, you’ll need to replace the placeholder olddomain.com and newdomain.com values with your own. Make sure to enter the correct http and https values as well or it might not find the actual reference in the database.
Then click GO in the bottom right, and that’s it!
To make sure it worked, you can click on your database name on the left hand side after running this query, and find the wp_options table in your database rows. If it was successful, you should see your new domain in the home and siteurl options. If you don’t, something wasn’t done properly.
Upload Your Files
To overwrite the WordPress files, you’ll need to still be logged into cPanel, or whatever panel you are using (or use FTP to find the root folder), and replace ALL the files including the wp_content, wp_admin and wp_includes folders, and their contents.
WARNING! The only file you do NOT want to replace and overwrite is the WP-CONFIG.PHP file. This one needs to stay intact as it has the information to connect to your new database!
Once again, this can take a while, but after a few minutes (depending on the size of the site), your website is ready to go!
How to Migrate Your WordPress Site With a Plugin
If the manual process wasn’t for you, that’s definitely understandable, as it’s a very complicated process that takes practice and patience. At NOBL Web, many of our clients experience anxiety when moving their website, but it’s a good thing there are many great third-party plugins to alleviate the stress!
Understanding how to migrate a WordPress website manually is useful, however, the following plugins are some of the best tools you can use to simplify the process:
All-in-One WP Migration
All-in-One WP Migration is without a doubt one of the most trusted and used plugins for moving websites easily and hassle-free!
It’s built for non-technical users, so All-in-One WP Migration comes loaded with easy-to-follow instructions that allow you to migrate your WordPress website with little to no technical knowledge.
- Install All-in-One WP Migration plugin.
- Hit the export button to bundle your database, media files, plugins, and themes into one tidy file.
- Unpack the file at the new location with an easy-to-use “drag and drop” feature in the WordPress dashboard of your new website.
UpdraftPlus Migrator
Updraft Migrator is one of the easiest and best solutions for migrating websites. In fact, it’s our go-to solution for getting the job done quickly and without any down-time!
UpdraftPlus is WordPress’ most popular back-up plugin, but by installing the Migrator add-on, you simply need to create a backup of you existing website, create a new WordPress installation on your new host, and “restore” your backup on that new site. That’s it! It’s all automatic.
- Backup your existing website.
- Create a new WordPress website on your new host.
- Install Updraft Migrator.
- Restore your backup on your new website.
Automated WordPress Migration Solutions
If you’re lucky, your new host will offer automated migration solutions. Some of the industry’s big names offer this. Hosts like GoDaddy offer automated WordPress migration services with their Managed WordPress accounts, while more tailored hosts like WP Engine offer a similar service, with a special plugin that comes with your hosting account.
Google “automated WordPress migration” along with your preferred host’s name for more information about their services and if they offer a solution that’s right for your business.