Last Updated on April 23, 2022 by WP Knowledge Hub
GeoDirectory is one of WordPress’ most advanced and scalable Directories plugin. GeoDirectory is the only WordPress directory plugin on the market that can scale to millions of listings and handle the traffic that comes along with that. Using any WordPress theme, you can turn your website into a super-effective and professional business directory.
GeoDirectory WordPress Plugin
In order to get your business directory off the ground, you’re going to need to install the fee Geodirectory plugin by AyeCode Ltd. You can also just go to Plugins > Add New > and search for GeoDirectory. Look for the one called Business Directory Plugin | GeoDirectory.
Install the plugin and activate it.
Upon installing it, GeoDirectory will ask you to complete the setup wizard in order to set it up in the quickest way possible.
The first major decision you’ll be asked to make is whether or not you want to use a Google Maps API. If you don’t, the plugin will still work just fine. Enabling Google Maps API will be necessary if you have a very large number of map interactions per month, or if you want to heavily customize your maps, but this option can be added later on, so don’t worry!
Next you’ll want to set your default location, and choose whether or not you want to add the extra plugin add-ons for GeoDirectory. We STRONGLY recommend that you install AyeCode Connect and UsersWP, since it will make the process a lot simpler down the road. If you need a contact form plugin, Ninja Forms is a fantastic option, but there are tons of quality form plugins out there, and you might not need a second one if your website is already setup.
In the Content tab of the setup wizard, you’ll be asked if you want to generate some dummy data. You’ll need to delete or replace these later if you do, but we suggest generating just a few posts to get a feel for how to create other ones from scratch. Select something like ‘5 posts’ and click Insert Posts.
Make sure you allow GeoDirectory to collect non-sensitive diagnostic data and usage information (it will be helpful to the awesome support team when you run into issues), then return to your WordPress dashboard.
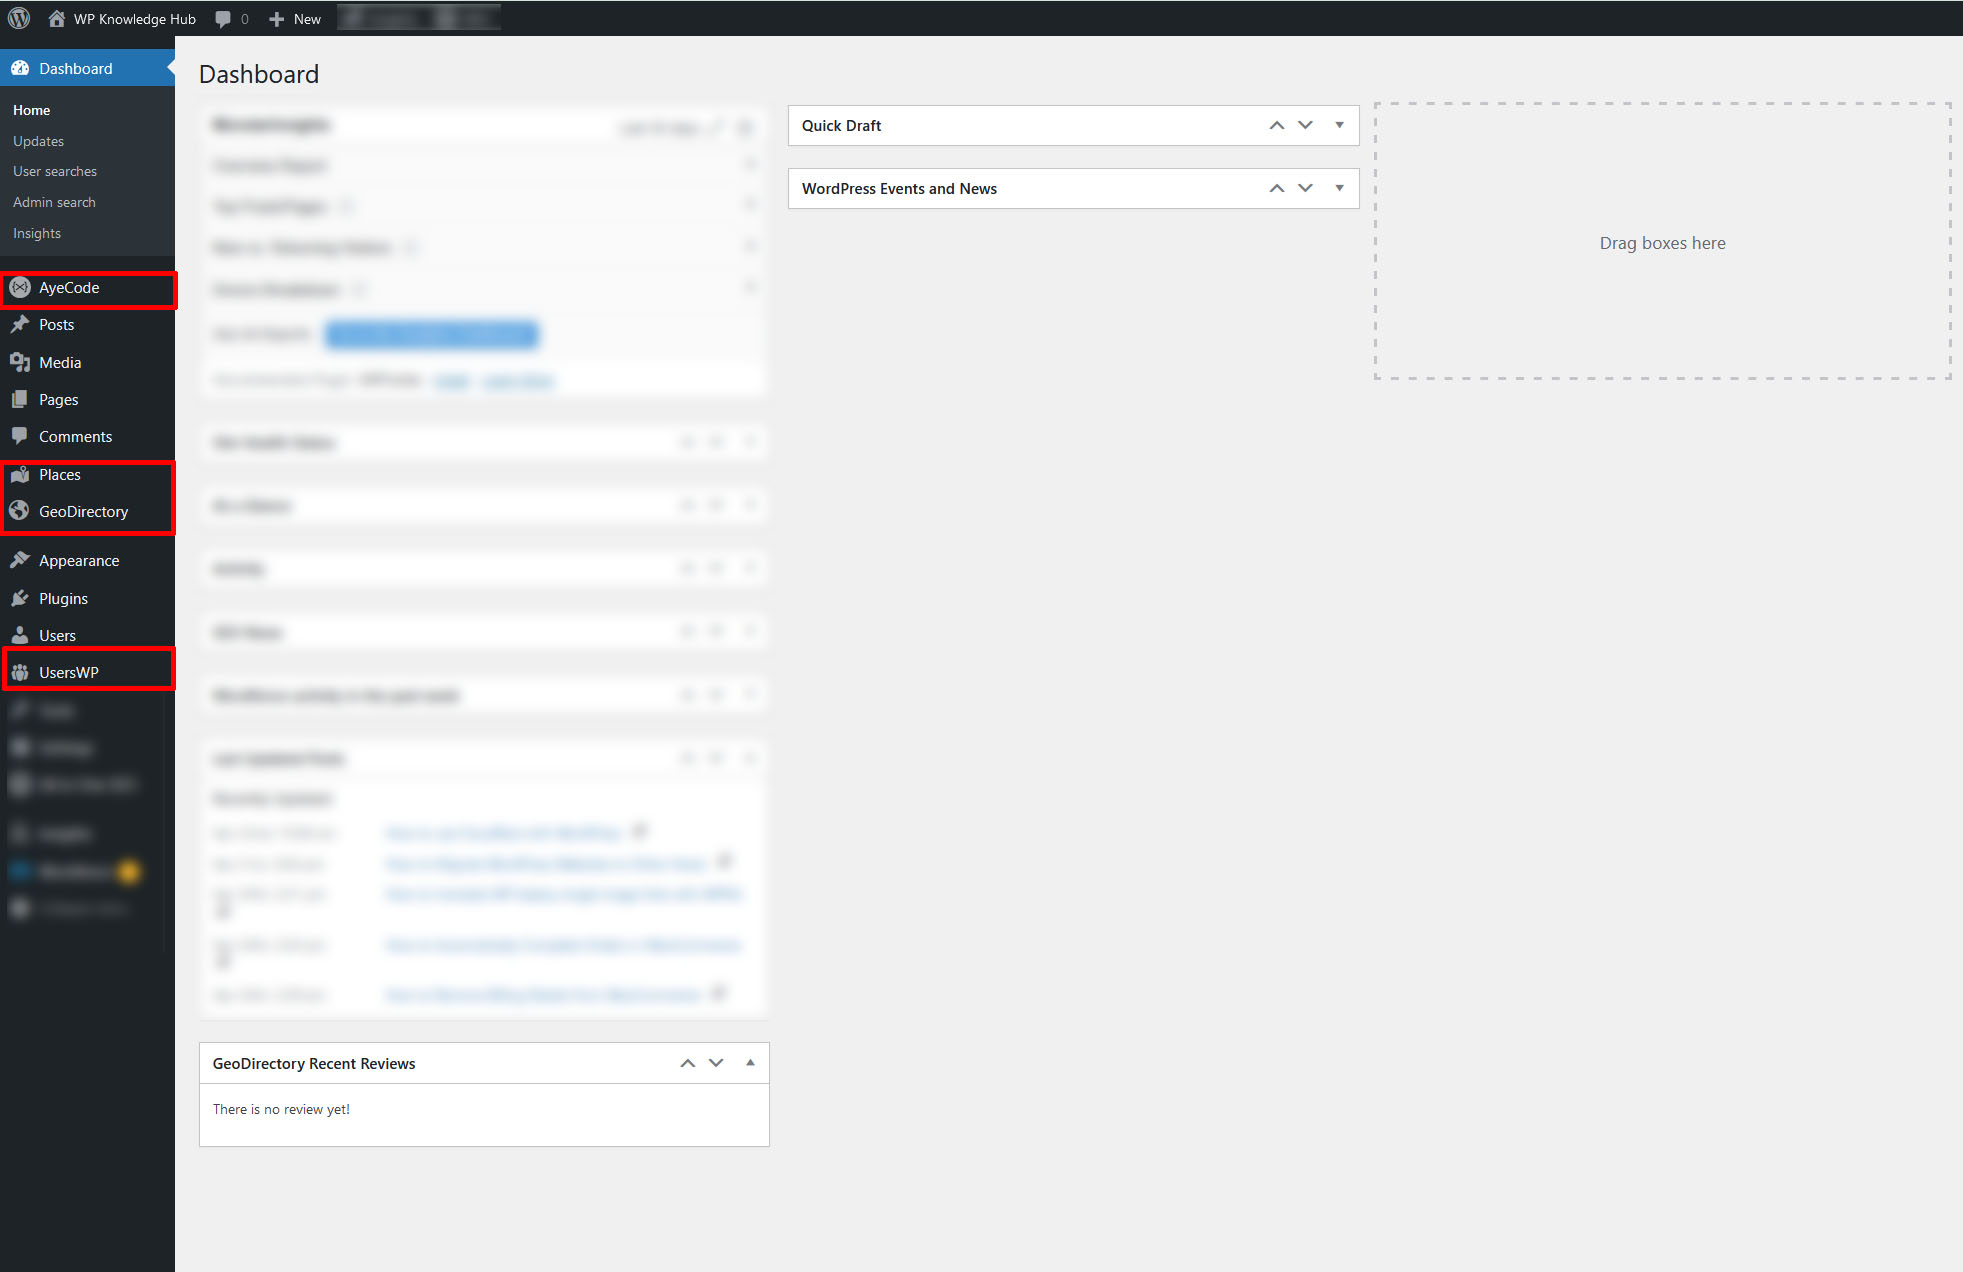
When you finish going through the setup wizard, your dashboard sidebar will have some new options for you: GeoDirectory, Places, and also AyeCode and UsersWP. If you don’t see AyeCode or UsersWP, it’s because you didn’t install the extra plugins. No worries, the directory will still function without these.
The GeoDirectory tab is mostly settings and analytics you need to setup and maintain the overall directory, while the Places tab is a Custom Post Type that acts a “second blog structure” independent of your Posts or Pages, with its unique kind of special posts called “Places”. These places are the individual business listings.
GeoDirectory Settings
In the GeoDirectory Settings page, you’ll find some useful settings that you might have already gone over in the setup wizard, and some more options like Email, Design, and other General Settings.
If you didn’t set your Google Maps API before, you can always do it here at anytime. Other than that, feel free to look around if anything else intrests you, otherwise, you can move on the Places.
Places Settings
In the Places page, you’ll notice that it looks very similar to the Posts or Pages layout. As mentioned before, this is because it’s a Custom Post Type, that works kind of the same way as your regular posts, but has its own archive, categories and settings.
If you added some dummy content, you’ll see them here. Feel free to edit any of them to start exploring your places, or start creating your first one by clicking Add New at the top.
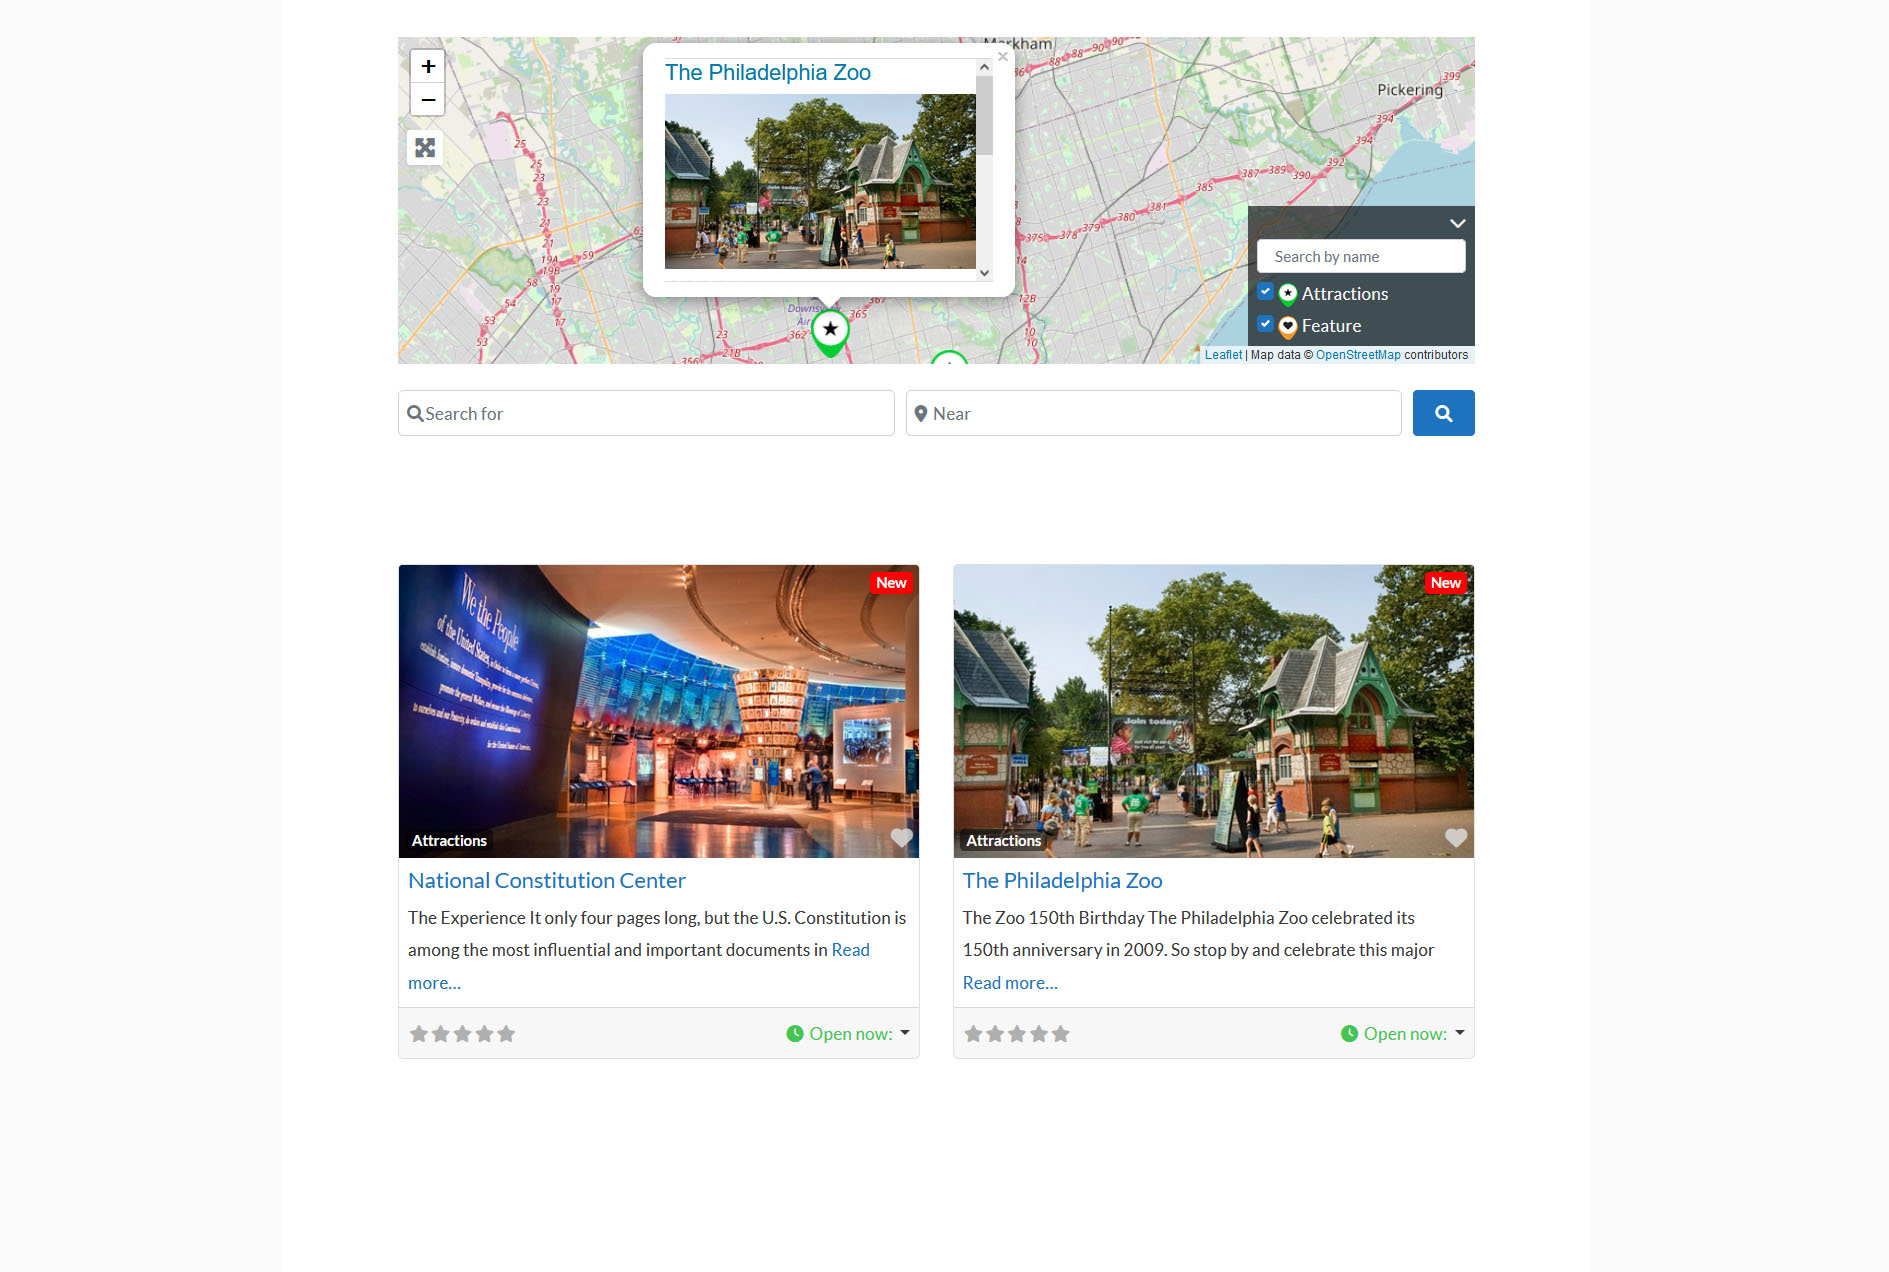
Here, on the left, you’ll see your Place title and description, and on the right you’ll see the Place tags, Featured Image and Image galleries. Further down below the Place description editor, you’ll see the Place Information.
Here you can set your Place category, location, see the map layout, phone, email, social and website information, plus the business hours of operation.
When you fill all this information in and save your Place, you’ll be able to see it as a business in your directory (which we’ll show you how to display on your website in a minute).
GeoDirectory Pages
Places are the business directory entries in the GeoDirectory plugin, therefore, GeoDirectory create a set of special Pages for itself to display these Places in your WordPress website called ‘GD Templates’, and you can find those in your Pages menu.

These pages are:
- Add Listing page
- GD Archive page
- GD Archive Items page
- GD Details page
- GD Location page
- GD Search page
The Add Listing Page
The Add Listing Page is the page that displays the form that allows new users to submit their listing to your directory. Without it, you would need to populate all the listings yourself. If that’s your plan, you won’t need this page, but if you want business owners to do the heavy lifting themselves, you’ll need to open up your WordPress registration to all, and keep this page published.
The GD Archive Page
The GD Archive page is the one that displays the general loop of all your Place categories. If you need to make modifications to the general archive template, this is where to do it.
GeoDirectory offers a pretty extensive list of blocks that you can search for in Guttenberg by typing GD.
The GD Archive Items Page
The GD Archive page is the sub-archive for single categories. It works the exact same way as the template above.
The GD Details Page
The GD Details is one of the most important pages as it allows you to change the global information that displays on each individual listing. For example, if you want to remove the maps from each listing, because the listings have no physical addresses, you can simply remove the GD Map block from this page, and all maps will be removed for each listing!
The GD Location Page
The GD Location page is the page that displays the main map with all your listings! Essentially, this page IS your directory. Once you’ve added enough Places to go live, you can link to this page from your main navigation to display your business directory live on your website.
The GD Search Page
The GD Search page is exactly what it sounds like. It allows users to search for specific business using filters.
Launching Your Business Directory
Launching this directory is simple! Once your ready to roll it out to allow users to navigate your listings (Places), and even submit their own. You’ll want to head over to your WordPress dashboard and go to Appearance > Menus.
Next, you’ll want to add the Location page to your menu and rename the tab to something like “Directory”.
If you want to allow users to submit their own listings, you’ll need to add a few more things to your navigation.
You’ll need:
- Access to the Account pages so users can login, logout, manage their listings and personal information, etc. (don’t forget to enable the WordPress registration in Settings > General > Anyone Can Register).
- Access to the Add Listing page, so users can submit their own listings.
If you added the UsersWP plugin as mentioned in the setup process, you should have additional pages created by this plugin called:
- Account
- Change Password
- Forgot Password
- Login
- Profile
- Register
- Reset Password
All those pages are necessary to allow users to manage their information by themselves. The UsersWP plugin does a great job at creating and setting up these pages so you don’t need to worry about it! All you need to do is add “Account” to your navigation to allow users to access them.
Your navigation structure should look something like this:

At this point, you now have a working business directory thanks to GeoDirectory! Your users can navigate to your directory and enjoy browsing your listings (Places) that, by default, will look something like this: